Monday, August 26, 2013

How to keep tomatoes from rotting

This summer has been wet. The tomato crop this season has not been good.
Most people we've talked to say their tomatoes look like -

our heirloom tomatoes last week. 
Hopefully future summer weather will return to normal. In the meantime, we just learned how we can best plant our tomatoes in anticipation for summer rain next year. 

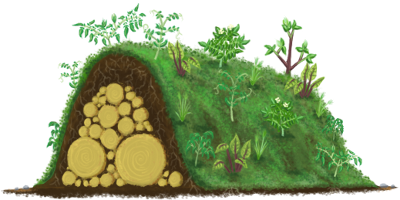
Our friend messaged us how he achieved a successful tomato crop, "My tomato beds are done in hugelkultur. 2 feet deep, filled with hardwood logs, and pile the dirt back on top to be about 2 feet tall. The tomatoes have good drainage now. They're up off the ground so the breeze can keep the plants drier than they would be planted at ground level. Constant water supply and they don't have wet feet. I haven't had a problem with bottom rot or moisture splitting despite all the rain."

They are pretty cool. The photo below is from this place and they have more information on this genius garden bed. 


With less rotting garden tomatoes - the more fresh food we can harvest to preserve for the winter! Read this expert canning supply post about making Salsa from Red Hill's tomatoes, green peppers and hot peppers!


Friday, June 21, 2013

Preserving Apricots

Apricots are in season in much of the country right now. So how can you get these delicious little beauties ready for preserving?

Making Apricot Jam:

Make your own apricot jam.

You will need:
8 cups of apricots, diced
6 cups of sugar
1/4 cup of lemon juice
5 pint jars or 10 half pint jars

Directions:
Get out your water bath canner and sterilize your canning jars by boiling for 10 minutes.
Get out a stock pot, combine all your ingredients and bring to a boil over med-high heat. Stir occasionally until your sugar is dissolved.
Once the sugar is dissolved bring to a rolling boil and boil for 30 minutes being sure to stir frequently to avoid your mixture from sticking to the stock pot.
Remove pot from the heat and begin filling your jars. Your headspace will be 1/4". (a good canning funnel will help to fill your jars with minimal mess.)
Wipe the jar rims clean and put your canning lids and rings into place. Screw on the rings to finger tightness.
Process jars in water bath canner for 10 minutes.

Dried Apricots

Dried apricots make a great snack anytime.

How to Dry your own Apricots:
Using a food dehydrator:
Split each apricot and place them in a single layer onto your dehydrator's trays.
If your dehydrator has a thermostat set it to 135 degrees. Allow the apricots to dry until their skin is leathery. This will typically take about 12 hours.
Check your apricots, they should be pliable and leathery with no juice.
Store your apricots until they are needed.

What is your favorite method for preserving your apricots?


Thursday, June 13, 2013

Set your Sundial

The best time and day to set your sundial for most accurate reading for the summer is on June 15th at 12:00. The next date that you will be able to set your sundial for accurate reading will be September 1st at 12:00.

To Set your Sundial
  • Make sure the spot that your sundial is in is level and has full sun.
  • The shadow arm (gnomon) needs to be pointed toward celestial north if you are in the northern hemisphere. This is different than the magnetic north that a compass will show you. To find celestial north you will need to set your sundial at noon. Turn the sundial so the gnomon's shadow falls directly on the sundial's mark that shows where noon is.
  • This is known as SUN TIME.
For the most accurate sundial set it on one of the following days:
April 15, June 15, September 1, December 24.

Keep in mind that to your sundial noon is always going to be when the sun is highest in the sky.


Friday, June 7, 2013

Harvest the Rain

Rainy days remind me of the value of water. I took this photo today as I was walking, thinking about how I wish I could collect these drops of rain and save them for the dryer days of summer to water my plants. When the rain returns to earth, it brings with it the things of the air. The air is clean and sweet in the mountains, so it is not surprising that it makes the fruits of our labor sweeter, too.


Harvesting rainwater is a simple best management practice for gardeners that has the dual purpose of saving money and water resources. At Red Hill, they sit their buckets outside to capture the rain, then use it to water their flowers. Better yet, you can connect a rain barrel to your existing gutter system to store the free, fresh water to keep your gardens, flowers, and lawns fecund all summer long. Here is a lovely picture of Red Hill's dusty miller and geranium flowers glistening with rain today in Hillsville.


Want to learn more? Check out this fact sheet from the Virginia Tech Cooperative Extension on the sustainable benefits of harvesting rainwater to treat stormwater runoff.


Friday, May 3, 2013

Window Boxes - A Little Info

We've talked a lot about container gardens in the past and we always mention window boxes, but we've never truly delved into explaining how to get a window box set up properly.

Choosing your window box:
You will need a box that spans the width of your window frame.

How to support your window box:
You will need stout steel angle brackets. The bracket ends need to be bent up in order to hold the box in place. You should then secure the box even further by attaching nooks to the box ends and using short lengths of metal chain or wire, connect to hooks that are screwed into the wall or window frame.


Now, if you have a wide flat window sill that can hold the box then you should still use the hooks and chain, this helps to stabilize the box during wind or bad weather. If your window sill is not horizontal, you will need to get wedge shaped pieces of wood to fit beneath the box and be sure that they are thick enough and spaced far apart enough for your box to be able to have a drip tray.

How to choose your brackets:
The brackets come in a variety of sizes and designs. Choose ones that suit your home's exterior, but are also strong enough to support your window box.


Tuesday, April 30, 2013

Using 5 Gallon Buckets in a Container Garden

We've noticed that our container gardening blogs are a big hit with you guys. Which is great! Container gardens are an easy way to break into gardening or to be able to maintain a garden with a busy schedule. When you have a container garden your work is cut nearly in half (if not more so) as it is easier to keep your plants healthy by keeping weeds at bay and being able to more easily amend the soil. Bucket Outlet featured a blog recently on how to use 5 gallon buckets in your garden and we thought we would share it here as well:
Vegetable gardening can seem like a huge chore to undertake, but if you create a container garden for your vegetables, you can maintain your plants much easier. All you need are some 5 gallon buckets. If you want to mix things up a little, you can also use galvanized tubs or even camouflage buckets. If you have some plants that don't need as much space, you can add smaller plastic buckets to the mix for a stepping stone effect to your container garden.

First step is to prep your buckets:
Be sure that your bucket is either new, or if it is a recycled bucket that it was never used to hold any type of chemical since you will be growing foods for consumption in them.
Using a drill, make drainage holes in the bottom of your bucket, they should be about 5/8". You will need about 10 or so holes for good drainage.
To keep the holes from getting stopped up with soil, add about 1-2" of gravel to the bottom of you bucket.
Fill with a good potting soil, fill to within 1.5" from the top of the bucket.

Plant your Vegetables:
Choose your vegetables that you want to plant, be sure you read how much space each plant needs, how much sun, and water.
Plant your plants according to their needs. Try not to plant too close to the sides of the bucket or you risk your plants getting too hot. Keep them at least 1.75" from the edge of the bucket.
If you have plants that are small enough to plant near one another, keep in mind which plants make good companions to each other.
Place your buckets in your yard for the best sunlight, and easy access for watering. You will need to check container plants daily for whether they need water or not as container plants tend to dry out more quickly.

Be sure to harvest fruits and vegetables as they ripen, this will help your plants continue to produce throughout the season.
We hope this information helps you in getting started on your very own container garden! If you have tips or questions don't hesitate to leave them for us in the comments. 


Thursday, April 18, 2013

Using a Broadcast Spreader

There are a few advantages to using a broadcast spreader over a drop spreader, especially if you have a larger yard or area that you are working with. The broadcast spreader has a larger area that it spreads over vs. a drop spreader, so it will cut the time you spend spreading down.

If you are using your broadcast spreader for spreading grass seed you will find that it works much better for certain grasses than a drop spreader does. With the drop spreader some grasses will grow in streaks instead of throughout the entire yard.

There are a variety of these types of spreader on the market, many are push spreaders, but if you have a very large area to cover you may want to look into investing in an ATV spreader.

To use your broadcast spreader you will first want to read your instructions thoroughly. As well as the instructions on the fertilizer or seed that you are spreading. The seed/fertilizer should have instructions on them for the recommended speed rate.

It is advised to do a test run with a small amount of your seed or fertilizer on a clean sidewalk or driveway so that you can ensure that you have the correct settings. You will want to make a note of how far the spreader distributes on different settings and write it down for future reference. Be sure to make note of how much product you put into the spreader and how large of an area it covered. Then compare this to how much coverage the product packaging states that you should have. If it doesn't cover enough area or covers too much then you will need to readjust your settings.

Collect your product so that you can reuse it. Do not just sweep or spray off into the yard.

Now you can fill up your spreader with the recommended amount of seed or fertilizer for the area that you need to cover. You will want to walk in a pattern that allows you enough space to only cover about 6 inches of the same area, this is okay to do since the outer edges of your spraying will receive less material. Usually the best pattern to spread in will be a row pattern.


Have more tips on using a broadcast spreader? Please share them with us in the comments.

Thursday, April 11, 2013

Preventing Diseases in Your Garden

The weather is warm and the dirt is waiting to be planted and tended for your garden. Excitement is in the air as you dream about the harvest you will have this coming fall. Make sure your harvest is not hindered by plant diseases. Take these precautions to help prevent diseases from forming in your garden:

Using Cured Compost will help your plants to be stronger, a stronger plant will be able to resist diseases more easily. Don't know how to cure your compost? Follow these easy steps:
To begin the curing process stop adding organic material to your compost heap.
Turn your pile once a week to allow oxygen to permeate the materials in your compost.
Wet your compost until it is the consistency of a wet sponge.
After 3 months your compost should be ready. If there are still large particles in your pile it needs to go through the curing process again.
Keep your garden watered during droughts. A weak plant will succumb to diseases more easily.

Space your plants wide and use trellises for plants that like to spread out. This will allow air to get around the leaves and dry your plants well, a continually wet plant is a breeding ground for diseases.

Use mulch to keep any soil born diseases from splashing up onto the leaves of your plants.

If a fungal outbreak begins on your plants you can slow it by using garden shears to cut off affected leaves, branches, and/or fruits. Only cut the plant if the foliage is dry, a wet plant will cause the spores to spread more quickly. There are also sprays that you can create to help kill the fungus. There are several for each different variety of fungus, if you have plants with hairy leaves you can use a mixture of 1 tsp baking soda to a quart of water and some drops of liquid soap as a spray mix.


A great sprayer for applying necessary treatments to sick plants or to spray on preventative treatments are the Solo sprayers.

Thursday, March 28, 2013

Garden Tasks as we Head into April

With all the snow we've been having lately it is hard to believe that we are already six days into spring. If you are still having snow these tasks may have to wait until the ground warms up a bit for you, but we wanted to go ahead and share this information with you.

Plant your leaf lettuce: keep in mind that they need 6 to 8 hours of sunlight a day.

Inside you will want to start your leeks: remember to plant one starter container for every leek you want to grow.

Also it is time to start your tomatoes inside: plant one starter container for every 10 to 12 lbs of tomatoes that you want. Also don't forget to invest in tomato rings and cages for when you plant them in your garden.

Plant green onions: your onions will need 6 to 8 hours of sunlight a day.

Plant carrots: they need 6 to 8 hours of sunlight a day.

Sow your hardy annuals such as wild flowers.

Repot any indoor plants that are starting to look tired. This is usually a sign that they need fresh dirt and a larger pot.

Time to plant fruit trees or wait until next year to do so.


Thursday, March 21, 2013

How to Prepare your Garden's Soil

To have a garden that grows well you have to have good soil so that the plants can thrive. Good soil has the nutrients that your plants need to grow and form beautiful fruits and vegetables.

To know what kind of soil you are working with you will want to have your soil tested. Your local County Cooperative Extension office should be able to supply you with information on soil testing in your area. Your soil sample will be sent to a laboratory and they will send you results that let you know what nutrients your soil needs and give advice on what steps should be taken in order to remedy this.

When you are adding nutrients to your soil after the soil test, you will only want to add nutrients that the test has deemed are needed. Adding things that are not needed can throw off the pH of your soil.

Fertilizer is also a needed additive to your soil, especially if you are growing a vegetable garden. Fertilizer will help your plants to produce much better fruits. There are many options in fertilizer in the categories of inorganic and organic.

If you want to fertilize your garden organically, one of the best ways is to create and use your own compost. For more information on composting check out these previous blogs:

Composting
Do NOT Compost These Items
Over 70 Things for the Compost Pile

Other organic fertilizers you can use in your soil are kelp, dried blood, cottonseed meal, cattle manure, horse manure, and chicken manure.

When using an inorganic fertilizer over a large area then you may want to look into using a broadcast spreader. This will help you even distribute the fertilizer over a large area.

During the growing season you may want to apply a side dressing (a boost of fertilizer) so that your plants continue to get the needed nutrients they need. To apply a side dressing you will want to make a 4 inch deep trench along one side of your plant row. Do not disturb the roots of the plants when you do this. Place your fertilizer into the 4 inch trench and cover it up with the removed soil. Watering your plants and rain will work your fertilizer into the soil so that it is easily used by your plants.


Wednesday, March 6, 2013

March Gardening Tasks

Spring will be upon us soon, what are somethings that you can be doing to help your garden?

Get out your gardening tools and be sure they are cleaned up and repaired if repairs need to be made.

Start indoor transplants of tomatoes, lettuce, eggplants, parsley, peppers, and other vegetables.

Turn your compost pile. (really this should be done weekly)

Start putting out your birdhouses

Fertilize shrubs and trees.

Prune fruit trees before the buds swell.

Start preparing the soil for your vegetable garden.

Peas, sweet peas, asparagus, rhubarb, artichokes, strawberries, blueberries, fruit trees, and horse radish can begin to be planted now.

Repair damaged areas of your lawn.


Tuesday, February 26, 2013

Preparing Containers for Plants

To use a container in your container garden you must be sure that it has enough drainage, is clean, pest free, and disease free. It also needs to be in good condition so that it will last longer. Whether you use planters, buckets, or a metal wash tub for your plants the following tips should be beneficial to you.

Clean Your Container:
If your container has been used in the past whether for planting or other things, you will want to be sure that you wash the container with a mild detergent. While washing your container checked for any damaged areas that may need to be fixed. Cracks can give way to the pressure of a plant's roots against them resulting in a broken container during the growing season. If the container cannot be fixed you may want to discard it in lieu of another one.

Proper Drainage:
Container grown plants have trouble if they do not have adequate drainage. The excess water can cause your plants to become water logged and this will make them sick or even kill them. You will need to have holes at the base of your container for excess water to be able to escape. If your chosen container does not come with holes already in it, then you will need to carefully drill some. To keep the holes from being clogged you will want to add gravel to the bottom of your container, 1-2" should suffice.

If your plant is on a surface that needs to be protected from water, then you will want to have a drip tray beneath it to catch the excess water that will come out.


Monday, February 18, 2013

Getting Ready for Spring

Don't' wait until the last minute to prep everything you need for your spring gardening. Here are some things that you can tackle now:

Work on your tools. You will want to tackle your gardening tools so that they are in the best shape possible before you begin using them. Sharpen any cutting tools. Clean, oil, and sharpen your digging tools. Replace any tools that are too damaged for repair.

Once the ground has thawed you can start planting your woody plants. If you have any shrubs or trees that need to be relocated the same rule applies to them as well, it can be done once the ground has thawed.

Clean up your yard. Winter can leave a lot of debris lying around. Broken branches, dead plants, leaves, etc. Get out your rake, wheelbarrow, gloves, and anything else that will help you tackle the mess.

Using compost or fertilizer bring your yard back to life and give your soil the much needed nutrients it will need to help your plants grow this spring.

Prune and shape any woody plants that need it.

Now sit back and plan our what you are going to plant this spring.


Friday, February 8, 2013

Handy Tools for the Gardener

Tools make gardening easier. From being able to get out weeds, plant your seeds, spread fertilizer, and more. Here are a few tools that even the most basic gardener can benefit from owning:

Garden Seeder: makes planting larger garden areas easier.

Hand Cultivator: great for roughing up soil for seeding in small garden beds or containers. Can also be used to remove weeds. 

Hand Trowel: great for using in container gardens and planting small annuals, herbs, and vegetables. Be sure to invest in a hand trowel that is comfortable for you to grip. 

Lawn Weeder: makes pulling dandelions and other weeds a much easier task.

Lopping Shears: great for pruning and dead-heading trees, shrubs, bushes, and vines.

Rake: Good for getting up leaves and other plant debris from your yard and/or garden area.

Spade: square-headed shovel with a short handle. Great for digging holes for planting, edging garden beds, removing sod, and moving small amounts of soil. You will want to have a spade that has a steel head and a strong handle. 

There are many more tools that can be used in a garden, but whether or not you need them depends on your garden size. Use your best judgement and get advice from other gardeners with gardens similar to yours as to which tools they find the most beneficial.

When investing in gardening tools be sure to invest in high quality tools so that they will last longer. Also be sure to keep them in out of the weather to help lengthen their lifespan.


Don't forget Red Hill General Store carries Garden Tools


Thursday, January 31, 2013

More Tomato Companion Planting Info

We've discussed companion planting with tomatoes in the past. But with the huge amount of traffic that blog has received, we've decided to look at this topic in more depth.

Tomatoes are one of the most popular plants in gardens, so it is natural that so many people are interested in the plants that they grow best with.

Asparagus: Tomatoes are a friend of asparagus. They help to protect asparagus from asparagus beetles by releasing solanine and attracting natural predators of the asparagus beetle. A chemical derived from asparagus juice has been found effective on tomato plants as a nematode killer,, including the root-knot sting, stubby root and meadow varieties.

Basil: Improves growth and flavor of tomatoes. 

Bee Balm: Like basil, it helps to improve the growth and flavor of tomatoes. It also helps attracts beneficial insects like bees.

Borage: Helps to deter tomato hornworms. Also attracts bees. When planted near tomatoes it helps to promote growth and disease resistance.

Carrots: These share space well with the tomato. Carrots can be planted while the tomatoes are still small and are usually ready for harvest by the time the tomato plants start to take over all the space.

Celery: Grows well with tomatoes. 

Chives: Improves growth and flavor of tomatoes. Helps to deter some insects and pest.
French Marigold: Helps to dispel white flies. 

Garlic: Can be used as a spray to help control late blight on tomatoes also helps to prevent red spiders.

Geranium: Repels Japanese beetles.

Horehound: Stimulates and aids fruiting of tomatoes.

Mint: Improves tomato health and deters ants, rodents, flea beetles, fleas, and aphids.

Nasturtium: Deters aphids, whiteflies, and pests of the cucurbit family. Attracts predatory insects.

Onions: Get along with tomatoes when planted together.

Parsley: Adds vigor to tomato plants. Attracts hoverflies and parasitic wasps.

Peas: Gets along with tomatoes when planted together.

Peppers, Bell: Does well when planted near tomatoes.

Petunias: Helps repel pests.

Poached Egg Plant: Attracts hoverflies.

Do not plant the following near tomatoes:
Brassicas, Corn, Fennel, Kohlrabi, Potatoes

Tomatoes like to grow in the same place year after year unlike other plants. They also make a great container plant, there are special tomato planters made just for planting tomatoes in containers.If planting tomatoes in the garden, you will want tomato stakes to help stabilize the plants as they get large and heavy.


Wednesday, January 23, 2013

Do NOT Compost These Items

Sometimes when you are just starting out with a compost pile it is hard to know just what you should and shouldn't put in there, for a list of items you should add please visit Over 70 Things for the Compost Pile. We've done some research on the things you should NOT add to your compost pile.

Cat, Dog, or Human Fecal Matter. While manure from chickens, horses, and cows is fair game, carnivorous animals' waste can introduce disease and parasites to your garden and to you when you harvest your food.
Diseased Plants. Plants that are diseased should never be added to compost. This can introduce the disease to new plants.
Meat, Fat, Grease, Oil. These items can attract pests and they can also coat your items in the compost preserving them and preventing them from breaking down.
Printed Glossy Paper. There are chemicals in the ink that may not break down well, as well as foil and glossy papers that do not do well in the breaking down process of your compost.
Salad Dressing, Mayo, Oily food stuff. These items will not break down well. They will stink up your garden and attract pests.
Sawdust from Treated Wood.
Weeds. Do not compost weeds as some seeds are not killed by the heat of the compost and the weeds will come up where you place your compost later.
Anything Treated with Pesticide or Herbicide. This can cause your compost to be fatal to your garden.


Don't forget, Red Hill General Store carries composting equipment and tools.

Tuesday, January 15, 2013

Over 70 Things for the Compost Pile

Sometimes when you are just starting out with a compost pile it is hard to know just what you should put in there. We've done some research on the best items for your compost pile.

Things you CAN compost:
100% Cotton non-dyed Clothes - cut into small pieces
100% Wool Clothing- cut into small pieces
Barnyard Animal Manures - bury well in your compost to avoid flies. Do not use pet or human waste in your compost.
Beer
Brown Boxes - shredded/torn
Brown Packing Tubes - shredded/torn
Brown Paper Shopping Bags
Burlap Sacks - shredded/torn
Cereal - stale
Christmas Tree - should be chopped up very well, preferable with a wood chipper
Coffee Grounds
Coffee Filters
Corn Husks
Cotton based tissues, napkins, and paper towels
Crackers - stale saltines
Crepe Paper Streamers
Dead Leaves - not from diseased plants
Dried Grass
Dust Bunnies
Egg Cartons - the PAPER ones
Egg Shells - need to be mashed into a fine powder
Fall Leaves
Feathers
Fish Parts/Seafood Scraps - best for large piles so they can be buried well
Floor Sweepings
Flowers from floral arrangements
Fresh Cut Grass
Fruit
Fruit Peelings
Hay
Herbs & Spices that are old
Jack o'Lanterns
Jelly, Jam, or Preserves that are old
Kelp
Kitchen Scraps
Laundry Lint (not fabric softener sheets)
Loofahs - the natural ones not synthetic - shredded/torn
Nut Shells - not walnut those can be toxic to plants
Oatmeal
Old Bread
Paper
Paper plates - be sure there is no waxy coating on them
Pasta leftovers - must be plain and cooked
Pencil Shavings
Pickles
Plant Prunings - not from diseased plants
Pine Needles
Pizza Box - shredded/torn
Pizza Crusts - tear into small pieces and bury well in the pile
Popcorn Kernels
Potpourri - ONLY natural
Pretzels - stale
Rice leftovers - must be plain and cooked
Sawdust - from untreated lumber
Seaweed
Shredded Newspaper
Soy/Almond/Rice milk
Spent Flower Blooms
Straw
Tea Leaves/grounds/bags
Tofu/Tempah
Toilet Paper & Paper Towel Rolls - shredded/torn
Trimmings from electric razor
Twigs - old & dry need to broken into small pieces

Vegetables
Vegetable Peelings
Wine
Wine Corks
Wood Ashes - in small amounts
Wood Chips
Wrapping Paper Rolls - shredded/torn
Wreaths - ONLY natural


Don't forget, Red Hill General Store carries composting equipment and tools.

Monday, January 7, 2013

Container Gardening Indoors for Veggies

Indoor container gardening is a great way to grow small vegetables, herbs, and certain fruits. If you live in an area that has minimal outdoor space, or if you want to try growing crops during colder months inside where it is warm, indoor container gardening might be for you.

First you will need containers to garden in, the containers that are able to be used vary greatly. You can use polyethylene plastic bags, clay pots, plastic pots, metallic pots, milk jugs, ice cream containers, bushel baskets, barrels, and planter boxes. The container you use needs to have good drainage, hold soil without spilling, be able to support the plants as they grow bigger, and should not contain any chemicals that are toxic to plants and/or human beings. Several vegetables that can be grown in backyard gardens can be grown in containers, although a container's diameter and depth need to be considered when selecting what vegetables to grow. The plant density depends on individual plant space requirements, and rooting depth.

The best vegetables for indoor container gardening are going to be vegetables that take up little space. Some examples are: carrots, radishes and lettuce, or crops that bear fruits over a period of time, such as tomatoes and peppers.

Another factor to keep in mind when choosing the plants that you want to grow in your container garden is how much sunlight your container will get each day, this factor will greatly affect what you can grow. A south facing sunny window is the best location for growing plants indoors. However, if you are very dedicated, there are grow lights that you may be able to incorporate into your indoor container garden, but these lights are not necessary if you have a well lit area in your home, unless you are growing fruiting vegetables such as tomatoes and peppers. These plants will also need supplemental light, such as a combination warm-white/cool-white fluorescent fixture, during winter months. Insufficient light will result in tall, spindly plants and failure to flower and set fruit.

When choosing your soil for your container plants a lightweight potting mix is ideal for vegetable container gardening. This enables you to have the best possible soil for your plants.

When planting your container crops you will need to fill a clean container to within an inch of the top with the slightly damp soil mixture. Peat moss in the mix will absorb water and mix much more readily if soaked with warm water before putting the mix in the container. Sow the seeds or set transplants according to instructions on the seed package. Put a label with the name, variety, and date of planting on or in each container. After planting, gently soak the soil with water, being careful not to wash out or displace seeds. Thin seedlings to obtain proper spacing when the plants have two or three leaves. If cages, stakes, or other supports are needed, provide them when the plants are very small to avoid root damage later.

You will want to check your plants' need for water fairly frequently as with small containers they can sometimes dry out quickly. To make watering easy it is smart to set the pots in large trays that have an inch or two of decorative stones in them. Not only will this prevent your having to move the plants in order to water them, which may discourage you from watering when you should, but it will also provide humidity, which is a major requirement, especially during winter when the house is warm and dry.


What works or doesn't work for you in your indoor garden?

Related Posts Plugin for WordPress, Blogger...